Most Next.js blog setup tutorials assume you already picked a CMS. This one shows the wiring from zero. You will see the exact files, the exact fetch calls, and the exact deploy steps that take you from an empty Next.js project to a live blog reading content from Kamaan. The goal is a working /blog route, working /blog/[slug] pages, multilingual routes, and ISR caching, in under sixty minutes.
Quick takeaways
- A Next.js + Kamaan integration needs about six files: a fetch helper,
next.config.jsimage config, a list page, a single post page, an ISR config, and a multilingual variant. - The Kamaan REST API returns JSON with
id,title,slug,content,excerpt,featured_image_url, andlanguage. No GraphQL, no SDK, no auth headers needed for published content. - App Router is the recommended shape because
generateStaticParamsandrevalidategive you ISR without extra plumbing. - Image domain whitelisting in
next.config.jsis the most common reason builds fail after the first fetch works. - Multilingual blogs only need one extra route segment (
[lang]) and a query param on the fetch call.
Why this guide exists
Existing Next.js blog tutorials usually start with "first, install Contentful" or "first, install Sanity". They skip the part where you compare CMS options, then skip the part where you handle the routing layer. That leaves a gap: developers who already know Next.js but want a content backend that does not need a schema migration, a GraphQL playground, or a config repo.
Kamaan sits in that gap. It is a headless CMS with REST API Delivery, Auto-Multilingual Delivery built in, and an MCP Server endpoint so Claude or ChatGPT can write directly into your blog. For the Next.js side, the integration is the same shape as Contentful or Sanity: fetch JSON, render markdown, configure ISR. The difference is what you skip: no SDK install, no token rotation for read access, no schema file. You read articles by site ID and slug.
If you are still deciding which CMS to use, read What is a headless CMS and Best headless CMS for startups first. If you already picked Kamaan, the rest of this guide is for you.
Here is the at-a-glance setup card before you commit time to the wiring.
Setup time benchmark
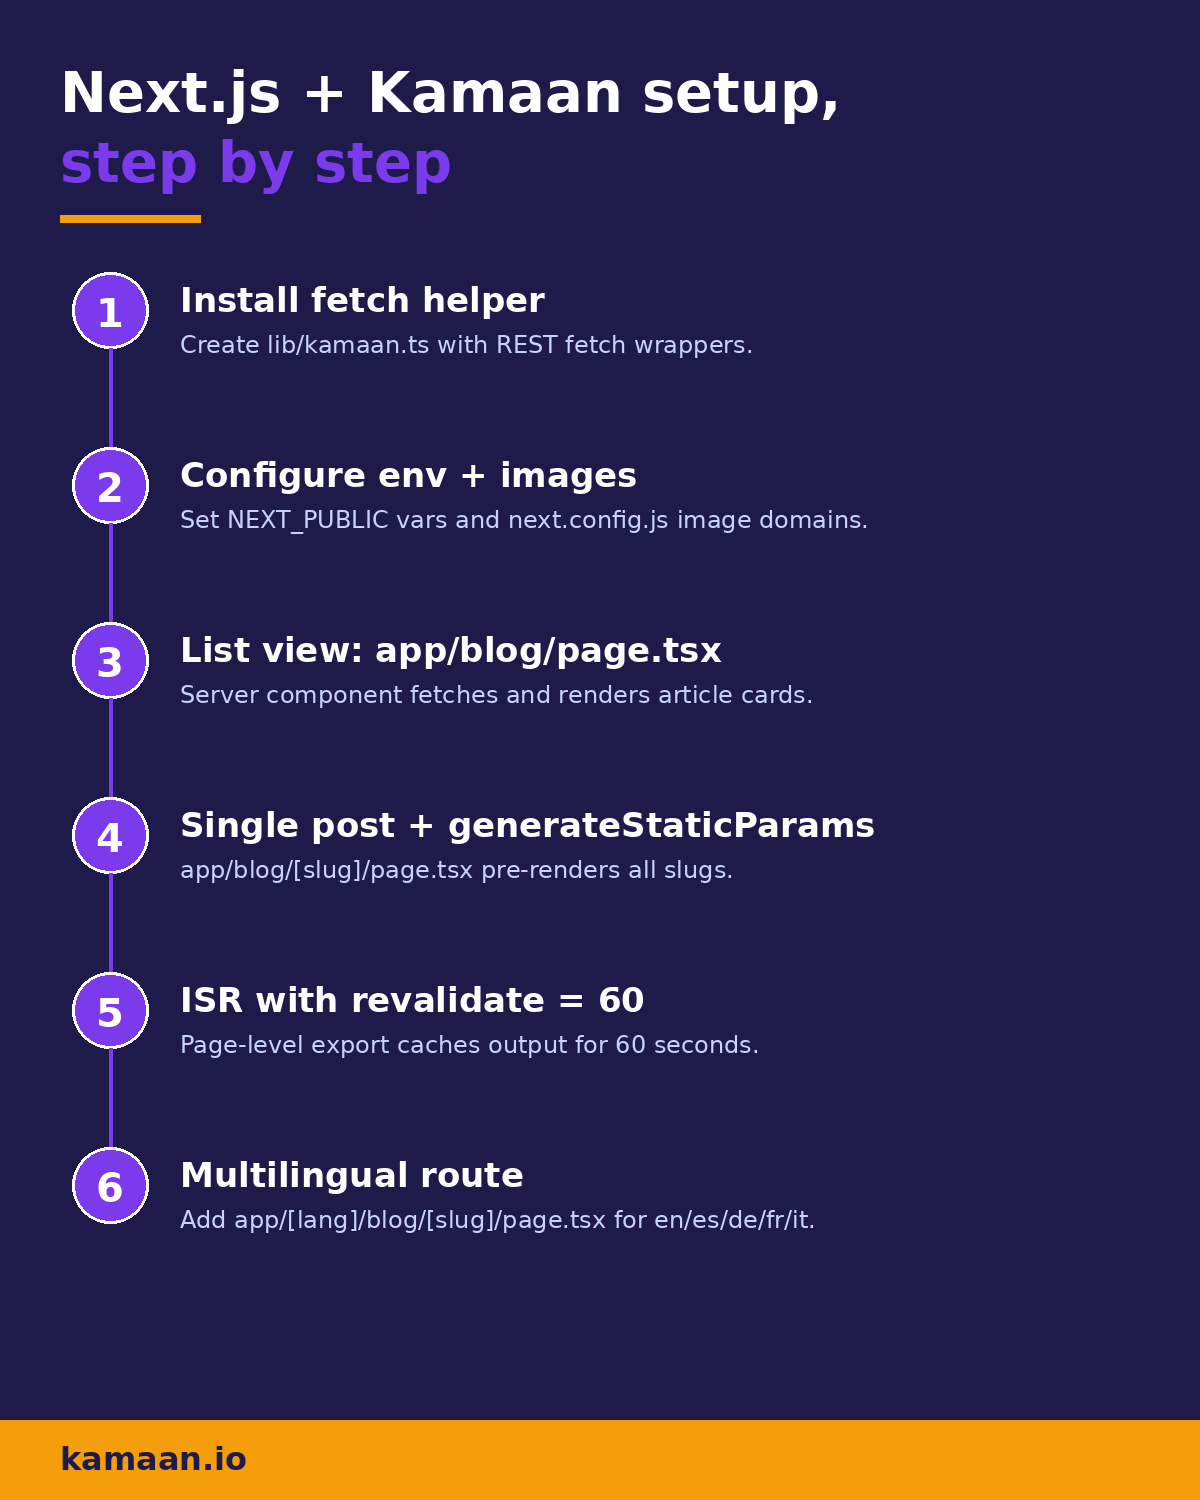
On the Kamaan side, publishing your first post takes about 14 minutes (account, site, first article, languages live). On the Next.js side, wiring the six files below is roughly 40 to 60 minutes for a developer doing it for the first time. The breakdown:
| Step | What runs | Where it runs | Estimated time |
|---|---|---|---|
| 1. Fetch helper | lib/kamaan.ts |
Server | 5 min |
| 2. Env vars + image config | .env.local, next.config.js |
Build time | 5 min |
| 3. List view | app/blog/page.tsx |
Server component | 10 min |
| 4. Single post | app/blog/[slug]/page.tsx + generateStaticParams |
Build + revalidate | 15 min |
| 5. ISR config | export const revalidate = 60 |
Edge or Node runtime | 5 min |
| 6. Multilingual route | app/[lang]/blog/[slug]/page.tsx |
Server component | 20 min |
The fifteen minutes on step 4 includes markdown rendering and featured image handling, which is where most projects stall. If you skip multilingual, you ship in forty minutes. The Kamaan dashboard work itself (creating the site, drafting the first article, watching translations land) is the ~14 min benchmark cited on kamaan.io.
Step 1: Fetch helper
Create lib/kamaan.ts. This file is the only place that knows the shape of Kamaan's REST API. Every other file imports from here.
const BASE = "https://api.kamaan.io/v1";
const SITE_ID = process.env.NEXT_PUBLIC_KAMAAN_SITE_ID;

export type Article = {
  id: string;
  title: string;
  slug: string;
  content: string;
  excerpt: string;
  featured_image_url: string | null;
  language: string;
  published_at: string;
};

export async function listArticles(lang = "en"): Promise<Article[]> {
  const res = await fetch(
    `${BASE}/sites/${SITE_ID}/articles?language=${lang}&status=published`,
    { next: { revalidate: 60 } }
  );
  if (!res.ok) throw new Error(`Kamaan list failed: ${res.status}`);
  const data = await res.json();
  return data.articles;
}

export async function getArticleBySlug(
  slug: string,
  lang = "en"
): Promise<Article | null> {
  const res = await fetch(
    `${BASE}/sites/${SITE_ID}/articles/by-slug/${slug}?language=${lang}`,
    { next: { revalidate: 60 } }
  );
  if (res.status === 404) return null;
  if (!res.ok) throw new Error(`Kamaan article failed: ${res.status}`);
  const data = await res.json();
  return data.article;
}
Two things to notice. First, the next: { revalidate: 60 } hint tells Next.js to cache the response for 60 seconds. That is your ISR layer for free, no separate config. Second, no auth header is needed for published content. If you want to pull drafts, you add an Authorization: Bearer <token> header. The token lives in .env.local, never NEXT_PUBLIC_*.
Step 2: Environment variables and image domains
Create .env.local:
NEXT_PUBLIC_KAMAAN_SITE_ID=6a15f18577639d2385209d06
Then open next.config.js and add the Kamaan image domain to images.remotePatterns. This is the most common build-time failure. The error reads Invalid src prop on next/image, hostname "cdn.kamaan.io" is not configured under images in your next.config.js.
/** @type {import('next').NextConfig} */
const nextConfig = {
  images: {
    remotePatterns: [
      { protocol: "https", hostname: "cdn.kamaan.io" },
      { protocol: "https", hostname: "images.kamaan.io" },
    ],
  },
};

module.exports = nextConfig;
Restart the dev server after editing next.config.js. Hot reload does not pick up image config changes.
Step 3: The list view
app/blog/page.tsx reads all published articles and renders cards. Server component, no client state needed.
import Link from "next/link";
import Image from "next/image";
import { listArticles } from "@/lib/kamaan";

export const revalidate = 60;

export default async function BlogIndex() {
  const articles = await listArticles("en");

  return (
    <main className="mx-auto max-w-3xl px-6 py-12">
      <h1 className="text-4xl font-bold mb-8">Blog</h1>
      <ul className="space-y-8">
        {articles.map((a) => (
          <li key={a.id}>
            <Link href={`/blog/${a.slug}`}>
              {a.featured_image_url && (
                <Image
                  src={a.featured_image_url}
                  alt={a.title}
                  width={800}
                  height={420}
                />
              )}
              <h2 className="text-2xl font-semibold mt-4">{a.title}</h2>
              <p className="text-gray-600 mt-2">{a.excerpt}</p>
            </Link>
          </li>
        ))}
      </ul>
    </main>
  );
}
export const revalidate = 60 at the page level is belt-and-suspenders alongside the fetch-level revalidate. Either one alone works. Both together is fine and makes the intent obvious to anyone reading the file later.
Step 4: The single post page
app/blog/[slug]/page.tsx reads one article by slug, returns 404 if missing, and renders markdown. This is the file most projects stall on, because three things have to line up: the dynamic route param, the static params generation, and the markdown renderer.
import { notFound } from "next/navigation";
import Image from "next/image";
import { remark } from "remark";
import html from "remark-html";
import { getArticleBySlug, listArticles } from "@/lib/kamaan";

export const revalidate = 60;

export async function generateStaticParams() {
  const articles = await listArticles("en");
  return articles.map((a) => ({ slug: a.slug }));
}

export default async function ArticlePage({
  params,
}: {
  params: { slug: string };
}) {
  const article = await getArticleBySlug(params.slug, "en");
  if (!article) notFound();

  const processed = await remark().use(html).process(article.content);
  const contentHtml = processed.toString();

  return (
    <article className="mx-auto max-w-3xl px-6 py-12">
      <h1 className="text-4xl font-bold">{article.title}</h1>
      {article.featured_image_url && (
        <Image
          src={article.featured_image_url}
          alt={article.title}
          width={1200}
          height={630}
          className="my-6 rounded-lg"
        />
      )}
      <div
        className="prose mt-8"
        dangerouslySetInnerHTML={{ __html: contentHtml }}
      />
    </article>
  );
}
generateStaticParams runs at build time. It pulls every published slug so Next.js can pre-render each post as a static HTML file. New articles published after deploy still work because of ISR: the first request hits the API, caches the result for 60 seconds, and serves cached HTML to everyone else.
Install the markdown deps:
npm i remark remark-html
If you prefer MDX, swap remark-html for @next/mdx and adjust the component shape. Most blogs do not need MDX. Plain markdown plus a Tailwind prose class covers 90% of cases.
Step 5: ISR, cache invalidation, and the gotcha
revalidate = 60 means a post change shows up within 60 seconds of the next request. That is fine for most blogs. If you want instant publishing, two paths:
- Set
revalidateto a longer interval and trigger on-demand revalidation from a Kamaan webhook. Kamaan can POST tohttps://yourdomain.com/api/revalidate?secret=xxx&path=/blog/[slug]whenever an article publishes. Your route handler callsrevalidatePath()and returns 200. - Use
revalidate = 0(SSR on every request). Slower for users, no cache layer, but always fresh.
Most teams pick option 1 once traffic grows. Until then, revalidate = 60 is fine.
Honest caveat: Vercel's Data Cache and the Next.js Full Route Cache do not always invalidate together. If you change an article and the new version shows on /blog/[slug] but the old excerpt still shows on /blog, that is the Full Route Cache for the index page lagging. Trigger a revalidate on both /blog and /blog/[slug] from the same webhook.
Step 6: Multilingual routes
This is where Kamaan saves the most time. Auto-Multilingual Delivery means one POST creates an article in English, and translations into Spanish, German, French, and Italian are available at the same slug under a language query param. Your Next.js side handles the route segment.
Move your blog pages under app/[lang]/blog/. Add language validation in the route:
const SUPPORTED = ["en", "es", "de", "fr", "it"] as const;
type Lang = (typeof SUPPORTED)[number];

export async function generateStaticParams() {
  const params = [];
  for (const lang of SUPPORTED) {
    const articles = await listArticles(lang);
    for (const a of articles) {
      params.push({ lang, slug: a.slug });
    }
  }
  return params;
}

export default async function ArticlePage({
  params,
}: {
  params: { lang: Lang; slug: string };
}) {
  if (!SUPPORTED.includes(params.lang)) notFound();
  const article = await getArticleBySlug(params.slug, params.lang);
  if (!article) notFound();
  // ... render as before
}
Slugs stay English across all languages. That is a deliberate SEO choice: it keeps your URL structure consistent, simplifies analytics, and matches what every major SaaS blog does (Stripe, Notion, Linear). If you need translated slugs, store them in a slug map and resolve them in middleware. Most teams do not.
Here is the six-step setup mapped onto one image you can keep open while you build.
Real-world scenarios
Scenario 1: B2B SaaS blog, 40 posts, English plus Spanish
A two-person team migrated from a markdown-in-repo blog to Kamaan because every content update required a deploy. Setup took the senior engineer 50 minutes following this guide. The Spanish version of all 40 posts was generated automatically by Kamaan's Auto-Multilingual Delivery. Total time including translations: 70 minutes. Deploy was instant because the existing Next.js app was already on Vercel.
Scenario 2: Solo founder, no posts yet, multilingual from day one
A solo developer wanted English plus four languages from launch. She skipped the markdown-in-repo phase entirely. Setup was 45 minutes for the Next.js side and 15 minutes for the first article (written in Kamaan, auto-translated, published). The MCP Server endpoint let her write subsequent articles by talking to Claude, which posted directly into Kamaan.
Deploying to Vercel
Three steps:
- Push the repo to GitHub.
- Import into Vercel. Vercel detects Next.js automatically.
- Add
NEXT_PUBLIC_KAMAAN_SITE_IDto Vercel's environment variables. Redeploy.
That is the entire deploy. ISR works on Vercel out of the box. The build runs generateStaticParams, pre-renders every article, and the runtime handles new articles via the revalidate hint.
If you deploy elsewhere (Netlify, Cloudflare Pages, your own Node server), ISR semantics vary. Cloudflare Pages with @cloudflare/next-on-pages works but uses KV for the cache layer. Self-hosted Node servers need the standalone output mode and a persistent filesystem for the cache to survive restarts. Vercel is the path of least friction.
FAQ
How long does a Next.js plus Kamaan setup actually take?
Forty to sixty minutes for an experienced Next.js developer following this guide. The single biggest time sink is markdown rendering, which adds about ten minutes if you have not done it before. Multilingual adds another twenty.
Do I need TypeScript?
No. Every example here works the same way in plain JavaScript. The Article type is documentation, not a runtime requirement. Most teams using Next.js already use TypeScript so the examples assume it.
Can I use Pages Router instead of App Router?
Yes. The fetch helper stays identical. Replace app/blog/page.tsx with pages/blog/index.tsx, use getStaticProps for the index, and getStaticParams plus getStaticProps with revalidate: 60 for the single post. App Router is recommended for new projects because the ISR ergonomics are cleaner.
What about RSS, sitemap, and Open Graph?
Kamaan auto-generates RSS at https://api.kamaan.io/v1/sites/{site_id}/rss. The sitemap is at /sites/{site_id}/sitemap.xml. Both update whenever you publish. For Open Graph, set the title, description, and featured_image_url in Kamaan's SEO fields, then read them in your Next.js generateMetadata function.
How do I preview drafts?
Pass an Authorization: Bearer <token> header on your fetch call and add &status=draft to the URL. Most teams gate this behind a /blog/preview/[slug] route with a secret cookie. Kamaan's API supports preview tokens directly so you do not have to roll your own.
What if I want to add a CMS like Contentful or Sanity later?
The fetch helper is the only file that changes. Swap the API URL and the JSON parsing, keep the page files. That is the value of treating the CMS as a JSON source rather than an SDK dependency.
Does this work with React Server Components?
Yes. Every example above is a server component. No "use client" directive needed unless you add interactive widgets like a search bar.
Can I run this without Vercel?
Yes, with caveats. Cloudflare Pages, Netlify, AWS Amplify, and self-hosted Node all support Next.js. ISR works on Vercel and Cloudflare out of the box. On Netlify, ISR requires their On-Demand Builders. Self-hosted needs the standalone output mode.
Related on Kamaan
- How to add a blog to your SaaS
- What is a headless CMS
- Best headless CMS for startups
- How to build a multilingual blog
Start building with Kamaan
A Next.js plus Kamaan blog is six files and an hour of work. Sign up for Kamaan, create a site, copy the site ID, and follow this guide. If you get stuck on image domains or ISR caching, the docs cover both with example projects you can fork.